Whisking Up Joy: The Magic Behind Cookie Monster Cake
Are you planning a special birthday celebration that will light up your child’s face with pure delight? Look no further than the adorable, googly-eyed sensation that has captivated children for generations – the Cookie Monster cake! This vibrant blue creation doesn’t just satisfy sweet cravings; it creates magical moments that become cherished childhood memories. Whether you’re an experienced baker or a novice in the kitchen, this guide will walk you through creating a showstopping Cookie Monster cake that will have everyone at the party saying “Me want cookie!” By the end of this article, you’ll have all the tools, tips, and inspiration needed to bring this beloved Sesame Street character to life on your child’s special day.
Why Cookie Monster Cake Are a Birthday Party Hit
The Enduring Appeal of Sesame Street Characters
Cookie Monster has remained an iconic figure in children’s entertainment since Sesame Street first aired in 1969. With his unmistakable blue fur, googly eyes, and insatiable appetite for cookies, this lovable muppet connects with children on a fundamental level – the simple joy of indulgence. Unlike more complex characters, Cookie Monster’s straightforward personality makes him instantly recognizable even to the youngest party guests.
“C is for cookie, that’s good enough for me!” This famous catchphrase has transcended generations, making Cookie Monster cakes a hit not just with today’s children but with parents who grew up watching Sesame Street themselves. This nostalgic connection creates a multi-generational appreciation that few other character cakes can match.
Making Memories Through Creative Baking
The moment when a child first sees their character cake is truly priceless. Their eyes widen, their smile grows, and that reaction alone makes every minute spent decorating worthwhile. Child development experts note that themed celebrations help children feel special and recognized, building positive associations with birthdays and celebrations that last a lifetime.
In our social media-driven world, unique character cakes also provide the perfect photo opportunity. A well-executed Cookie Monster cake becomes not just the centerpiece of the party table but often the most shared image from the celebration. This intersection of childhood joy and Instagram-worthy creations has helped propel character cakes like Cookie Monster to the top of birthday party trends.

Essential Ingredients for the Perfect Cookie Monster Cake
Cake Base Options
When choosing the perfect foundation for your Cookie Monster masterpiece, you have several delicious options to consider:
Chocolate vs. Vanilla Debate: While vanilla cake provides a neutral canvas that won’t affect the blue frosting color, there’s something poetically appropriate about using chocolate cake for Cookie Monster. After all, what goes better with cookies than chocolate? For the best of both worlds, consider a marble cake that incorporates both flavors.
Allergy-Friendly Alternatives: With food allergies on the rise, many parents need adaptable recipes. Fortunately, Cookie Monster cakes can easily accommodate dietary restrictions:
- Egg-free cakes using applesauce or mashed banana as binders
- Dairy-free options utilizing plant-based milk and butter alternatives
- Gluten-free flours that can be substituted in a 1:1 ratio in most recipes
Store-Bought Shortcuts: Short on time? There’s no shame in starting with a pre-made cake base. Box mixes or even unfrosted cakes from your local bakery or grocery store provide a perfect foundation. The character comes to life through the decorating process, so starting with a time-saving base won’t compromise the magical end result.
Decorating Supplies Checklist
Creating Cookie Monster’s distinctive look requires specific supplies:
Food Coloring for the Perfect Blue: Gel food colors provide the most vibrant results without thinning your frosting. Brands like AmeriColor and Wilton offer “Royal Blue” or “Sky Blue” shades that perfectly capture Cookie Monster’s fur. For a more natural option, blue spirulina powder provides color without artificial ingredients.
Cookie Options: While chocolate chip cookies are the classic choice, consider these alternatives:
- Mini cookies work well for smaller cakes or cupcakes
- Chocolate sandwich cookies (with cream filling removed) create a dramatic contrast
- Homemade cookies can be shaped specifically to fit the cake design
Tools for Texture Creation:
- Grass piping tip (#233 or similar) for creating fur texture
- Round piping tips for outlining and detail work
- Offset spatula for applying the base layer of frosting
- Decorating bags with couplers for easy tip switching
Step-by-Step Cookie Monster Cake Tutorial
Baking the Perfect Base
Creating a sturdy foundation is crucial for any character cake. Follow these steps for a cake that holds its shape through decorating and serving:

- Prepare your cake pans thoroughly by greasing and flouring, or using parchment paper liners to ensure easy removal.
- Whether using a homemade recipe or boxed mix, add 1 tablespoon of cornstarch to your dry ingredients to create a tighter crumb structure that stands up to decorating.
- Allow cakes to cool completely in the pans for 10 minutes before transferring to a wire rack.
- Once cooled, refrigerate the layers for at least 1 hour before leveling and frosting. Cold cakes are much easier to work with and produce fewer crumbs.
- Use a serrated knife or cake leveler to create perfectly flat surfaces for stacking and decorating.
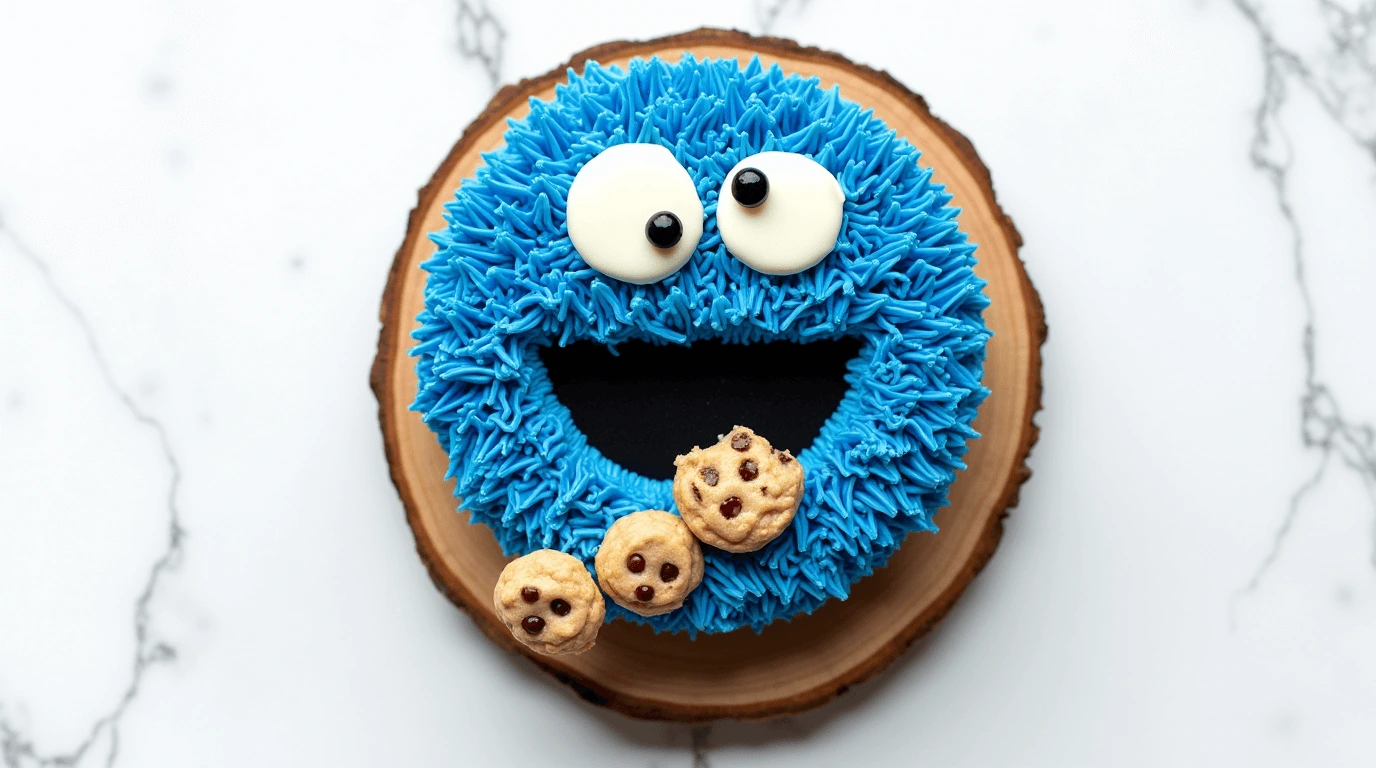
Creating Cookie Monster’s Signature Blue Fur
The furry texture is what transforms a simple blue cake into a recognizable Cookie Monster:
- Start with a crumb coat of regular buttercream in a light blue shade. This thin layer seals in crumbs and provides a base for the fur texture. Refrigerate for 20 minutes until firm.
- Prepare a stiffer buttercream for the fur texture, colored with royal or sky blue gel food coloring. The frosting should hold its shape when piped but still be workable.
- Fill a piping bag fitted with a grass or fur tip (#233 is ideal). Hold the bag perpendicular to the cake’s surface for the best fur texture.
- Begin at the bottom of the cake, piping short, quick strokes that pull slightly outward to create “fur.” Work in small sections, varying the direction of your strokes for a more natural look.
- For areas that need definition (like around the eyes or mouth), use a small round tip for more controlled piping.
Common issues and solutions:
- If frosting becomes too soft, refrigerate the piping bag for 5-10 minutes
- If the fur texture appears too uniform, intentionally vary the length and angle of your piping strokes
- If blue coloring starts to bleed into other elements, freeze those sections briefly before continuing
Adding Character with Eyes and Cookies
The final details bring Cookie Monster to life:

- Create Cookie Monster’s iconic googly eyes using:
- Large marshmallows or fondant circles for white portions
- Chocolate chips or black fondant for pupils
- Position eyes on the upper half of the cake, slightly askew for that authentic googly look
- The cookie placement makes or breaks the character design:
- Create a simple mouth shape with black piping or a chocolate cookie cut into a semicircle
- Position a chocolate chip cookie (regular or broken) at an angle partially inside the mouth
- Add cookie crumbs around the mouth area for an authentic “mid-snack” appearance
- Final touches:
- Add small dollops of white frosting to the eyes to create highlight reflections
- Consider adding fondant eyebrows for extra expressiveness
- A small fondant or frosting tongue peeking out adds whimsy and character
Recipe Details
Ingredients List
| For the Cake | Quantity |
|---|---|
| All-purpose flour | 2½ cups |
| Granulated sugar | 2 cups |
| Unsalted butter, softened | 1 cup (2 sticks) |
| Eggs | 4 large |
| Milk | 1 cup |
| Vanilla extract | 2 teaspoons |
| Baking powder | 2½ teaspoons |
| Salt | ½ teaspoon |
Expert Tips
Elevate your Cookie Monster cake with these professional insights:
- Texture is Key: The fur texture makes or breaks a Cookie Monster cake. Practice your piping technique on parchment paper before applying to the cake.
- Temperature Matters: Work with room temperature butter for the frosting, but cool the frosted cake between steps for better definition.
- Time-Saving Shortcuts:
- Prepare cake layers up to a month ahead and freeze tightly wrapped
- Create decorative elements like fondant eyes a day or two in advance
- Use pre-made cookie dough for the cookies (Cookie Monster won’t tell!)
- Make-Ahead Components:
- Bake and freeze cake layers up to 3 weeks ahead
- Prepare buttercream 3 days in advance and refrigerate
- Assemble base cake with crumb coat the day before decorating
- Storage Recommendations:
- Store finished cake in a cool room away from direct sunlight
- Refrigerate for longer storage, but bring to room temperature before serving
- Use a cake keeper or tent with foil for overnight storage, being careful not to touch the frosting

Nutritional Information
While birthday cakes are treats meant to be enjoyed in moderation, here’s what you can expect from a standard slice:
| Nutrient | Amount per Serving |
|---|---|
| Calories | Approximately 450-500 |
| Total Fat | 22-25g |
| Saturated Fat | 13-15g |
| Carbohydrates | 60-65g |
| Sugar | 45-50g |
| Protein | 4-5g |
Reduced Sugar Alternatives:
- Replace up to half the granulated sugar with applesauce in the cake
- Use 20% less sugar in the frosting and add a teaspoon of salt to enhance sweetness
- Consider using stevia-sweetened chocolate chips and cookies for decorating
Allergen Information:
- Contains: Wheat, dairy, eggs
- May contain: Nuts (depending on cookie choice)
- For gluten-free: Replace flour with a 1:1 gluten-free baking mix
- For dairy-free: Use plant-based butter alternatives and coconut cream
Portion Size Recommendations:
- For children under 5: ⅓ standard slice
- For children 5-10: ½ standard slice
- For adults: 1 standard slice (approximately 1/12 of an 8-inch round cake)
FAQ Section
Q: Can I make this Cookie Monster cake a day ahead? A: Absolutely! In fact, making it a day ahead is ideal. The flavors meld and the cake becomes more moist. Just store it in a cool place in an airtight cake container, or in the refrigerator if your kitchen is warm.
Q: What’s the best food coloring for vivid blue without affecting taste? A: Gel food colors like AmeriColor Royal Blue or Wilton Sky Blue provide vibrant color without thinning your frosting or adding a chemical taste. Start with a small amount and add gradually – you can always go darker, but you can’t remove color once it’s added.
Q: How do I transport a Cookie Monster cake safely? A: Invest in a cake carrier with a locking lid, or place the cake on a non-slip mat inside a box. For extra security, insert dowels vertically through the cake for stability during transport. Always keep the air conditioning on if driving in warm weather.
Q: Can I use gluten-free ingredients for this Cookie Monster cake? A: Yes! Use a 1:1 gluten-free flour blend in the cake recipe and verify that your food colorings are gluten-free. For the cookies, either purchase gluten-free chocolate chip cookies or make your own using gluten-free flour.
Q: How many servings does a standard Cookie Monster cake yield? A: An 8-inch round two-layer cake typically serves 12-16 people. For larger parties, consider making additional cupcakes to complement the main cake or scaling up to 9-inch cake pans.
Q: What are alternatives if my child has a dairy allergy? A: Replace butter with dairy-free margarine or shortening in both the cake and frosting. Use plant-based milk (oat milk works particularly well in baking) instead of cow’s milk. Ensure your food colorings and cookies are also dairy-free.
Conclusion
Creating a Cookie Monster cake isn’t just about baking – it’s about crafting a magical childhood memory that will be remembered long after the last crumb has been enjoyed. From the initial wide-eyed reaction to the joy of sharing this character creation with friends and family, a Cookie Monster cake brings the beloved Sesame Street character to life in the most delicious way possible.
Whether you’ve followed our classic design or ventured into more advanced territory with 3D elements, remember that the imperfect details often make character cakes more charming. Cookie Monster himself isn’t known for his neatness, after all!
We hope this guide has inspired you to embrace the fun of character cake creation for your next celebration. The time spent crafting these edible masterpieces translates directly into smiles, photos, and memories that will be cherished for years to come. And isn’t that what birthday magic is all about?
Share your Cookie Monster cake creations with us on social media using #CookieMonsterCake – we’d love to see your furry blue masterpieces and hear about the joy they brought to your celebrations!
Looking for more birthday inspiration? Check out our other character cake tutorials and kid-friendly party planning guides to make every celebration just as special as your little one.